https://toss.tech/article/frontend-tree-structure
자료구조를 활용한 복잡한 프론트엔드 컴포넌트 제작하기
왜 토스증권 PC의 그리드 레이아웃을 왜 직접 구현하게 되었는지, 그리고 어떻게 만들어져 있는지를 이제부터 소개해 드릴게요.
toss.tech
토스의 포스팅에서는 자료구조 이진트리를 활용하여 그리드 레이아웃을 유연하게 그릴 수 있는 혜안을 제시해줬다.
이 포스팅을 직접 구현해보기 위해 각각의 단계에 필요한 개념들을 만들어본 뒤 적용해볼려고 한다.
/** 이후 수정할 계획
1. 드래그 앤 드랍을 구현해본다.
2. 드랍 할 위치에 있는 콘텐츠를 대각선 2개 그은 뒤 사분면 중 어느 곳에 둘지를 결정하는 함수를 작성한다.
3. 드래그 드랍과 사분면 함수를 연결하여 드래그 한 것을 드랍 한 사분면에 놓았을 때 어느 위치인지 ui로 표시해준다.
4. 이진트리의 메서드를 구현한다
5. 이진트리의 노드에 삽입 될 패널 노드와 스필릿트 노드를 생성한다.
6. 컴포넌트들을 이진트리에 삽입 후 알맞게 레이아웃에 위치하도록 해본다.
1. 드래그 앤 드랍을 구현한다.
이 기능은 HTML API 중 하나인 drag를 활용하여 드래그 이벤트로 처리한다.
컨테이너 컴포넌트에서 drag할 요소를 기록할 ref와 drop 될 요소를 기록할 ref를 각각 선언한 뒤
각 컨텐츠에서 onDragStart 이벤트 시 drag ref 를 기록.
onDragEnter 이벤트 시 타겟이 drag ref와 값이 다를 경우 drop ref에 기록.
onDragEnd 이벤트 시 drag, drop ref가 다를 경우 둘을 교체 하는 실습을 진행. ( 지금은 실습만 하고 차후 교체가 아닌 해당 하는 위치에 스플릿 노드를 생성하고 스플릿 노드의 좌우 자식 노드로 drag drop ref를 둔 뒤 레이아웃을 그릴 거임 )
'use client';

import { useCallback, useEffect, useRef, useState } from 'react';

type ItemType = {
    id: number;
    color: string;
    sx: number;
    sy: number;
};
const dummyItems: ItemType[] = [
    {
        id: 1,
        color: 'bg-red-500',
        sx: 0,
        sy: 0,
    },
    {
        id: 2,
        color: 'bg-orange-500',
        sx: 0,
        sy: 0,
    },
    {
        id: 3,
        color: 'bg-yellow-500',
        sx: 0,
        sy: 0,
    },
    {
        id: 4,
        color: 'bg-green-500',
        sx: 0,
        sy: 0,
    },
    {
        id: 5,
        color: 'bg-blue-500',
        sx: 0,
        sy: 0,
    },
];

export default function Home() {
    const [items, setItems] = useState(dummyItems);
    const currentDraggingItemId = useRef(-1);
    const draggableTagetItemId = useRef(-1);

    const dragStartHandler = (id: number) => {
        currentDraggingItemId.current = id;
    };

    const dragEnterHandler = (targetId: number) => {
        if (currentDraggingItemId.current === targetId) return;
        draggableTagetItemId.current = targetId;
    };
    const dragEndHandler = () => {
        if (currentDraggingItemId.current === draggableTagetItemId.current)
            return;
        const copied = [...items];
        const sourcrIndex = items.findIndex(
            (i) => i.id === currentDraggingItemId.current
        );
        const destinyIndex = items.findIndex(
            (i) => i.id === draggableTagetItemId.current
        );
        const temp = structuredClone(items[sourcrIndex]);
        copied[sourcrIndex] = structuredClone(items[destinyIndex]);
        copied[destinyIndex] = temp;
        setItems(copied);
    };


    return (
        <section className="bg-slate-200  flex flex-col justify-between items-center gap-y-10 ">
            {items.map((item) => (
                <Item
                    item={item}
                    onDragStart={dragStartHandler}
                    onDragEnter={dragEnterHandler}
                    onDragEnd={dragEndHandler}
                    key={item.id}
                />
            ))}
        </section>
    );
}

interface ItemProps {
    item: ItemType;
    onDragStart: (targetId: number) => void;
    onDragEnter: (targetId: number) => void;
    onDragEnd: () => void;
}


function Item({
    item,
    onDragEnd,
    onDragStart,
    onDragEnter,
}: ItemProps) {

    return (
        <div
            draggable
            onDragStart={() => onDragStart(item.id)}
            onDragEnter={() => onDragEnter(item.id)}
            onDragEnd={onDragEnd}
            className={`size-72 ${item.color}`}
        />
    );
}
위의 코드를 실행하면 드랍 될 위치와 드래그 된 요소의 위치가 스왑 되는 것을 알 수 있다.
2. 드랍 할 위치에 있는 콘텐츠를 대각선 2개 그은 뒤 사분면 중 어느 곳에 둘지를 결정하는 함수를 작성한다.
이 동작을 통해 드랍 될 위치에서 상하좌우 중 어느 위치에 드래그 중인 요소를 둘 것인지 결정 할 수 있게 된다.
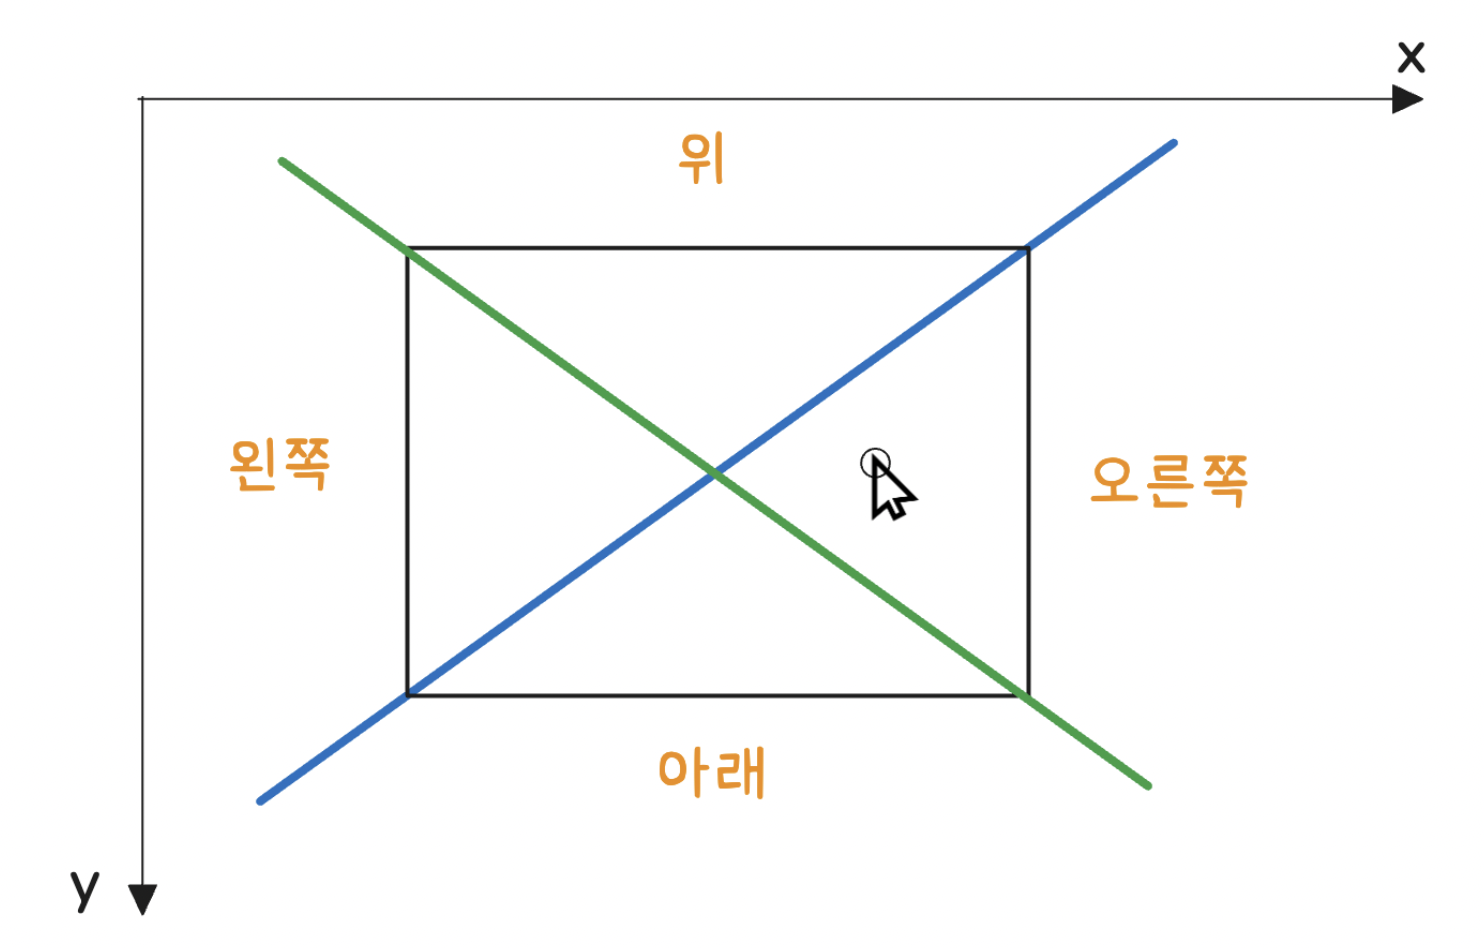
초록색 직선을 decline, 파란 선을 incline 으로 정의해본다.
우선 각 콘텐츠에 ref를 할당한 뒤 렌더링이 되면 각 콘텐츠의 page에서 위치한 x,y좌표값을 items에 할당해준다.
드랍 될 위치가 어느 사분면에 위치할지는 아래의 경우로 나누어진다.
드랍 될 위치의 currentY가 incline과 decline 함수의 x값에 currentX를 대입 했을 때 나온 값(y)보다
incline 보다 작고, decline보다 작다 => 상 ( 작다는 것은 좌표가 위에 있다는 것을 뜻한다 )
incline 보다 작고, decline보다 크다 => 좌
incline 보다 크고, decline보다 작다 => 우
incline 보다 크고, decline보다 크다 => 하
이제 incline 과 decline을 각각 구해본다.
두 함수는 y = ax + b 라는 일차 함수로 정의할 수 있다.
우선 기울기 a는 (y의 증가량/x의 증가량) 인데 0,0을 뷰포트 좌측 상단이라고 생각하면 기울기는 아래와 같다.
incline의 기울기 a = -h/w
decline의 기울기 a = h/w 이다.
b의 값은 각 함수가 지나는 좌표를 대입하면 구해진다.
사각형의 10시 방향에 있는 좌표가 시작점이므로 (sx,sy)로 정의하면 각 좌표는
(sx,sy) (sx+width,sy)
(sx,sy+height) (sx+width,sy+height)
이 된다.
incline이 지나는 점인 (sx,sy+h)을 y = -(h/w)x + b에 대입해보면
sy+h = -(h/w)*sx + b 가 된다.
b = sy+h + sxh/w
incline => y = xh/w + sy+h + sxh/w 라는 함수가 나오고 이것을 정리하면
incline => y = (sx-x)*h/w + sy+h 가 나온다.
같은 방식으로 decline -> y = h/w + b 에 지나는 점은 (sx,sy)를 대입해본 뒤 정리해보면
decline => y = (x-sx)*h/w + sy
이제 마우스가 클릭한 위치에서의 x좌표를 currentX라 두고 해당 콘텐츠(직사각형)의 좌측 상단 x,y좌표를 각각 startX,startY라 두면 해당 컨텐츠에서의 대각선 y 좌표를 구할 수 있다. 부동소수점으로 인해 값의 오차가 생길 수 있으므로 round 처리했다.
const inclineY = Math.round(
        ((startX - currentX) * HEIGHT) / WIDTH + startY + HEIGHT
    );
    const declineY = Math.round(
        ((currentX - startX) * HEIGHT) / WIDTH + startY
    );
이제 current Y 값을 inclineY, declienY 과 비교하여 사분면 위치 파악한다.
if (currentY <= inclineY && currentY <= declineY) return '상';
if (currentY <= inclineY && currentY >= declineY) return '좌';
if (currentY >= inclineY && currentY <= declineY) return '우';
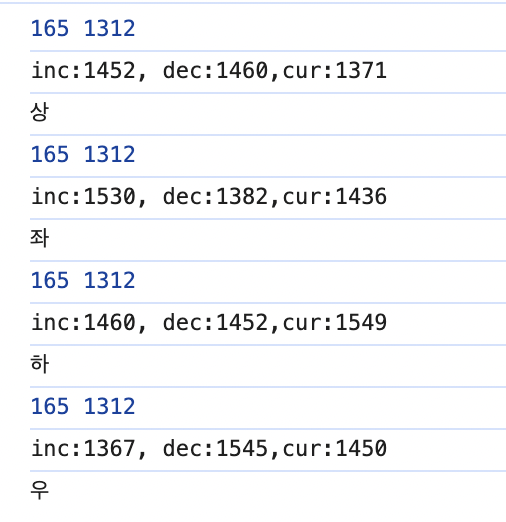
return '하';아래는 컨텐츠 좌측 상단의 좌표가 165,1312 일때 그 컨텐츠 내를 클릭하면 y값들과 함께 어느 사분면에 위치하는지 출력한 이미지이다.
const calculateQuadrantPosition = (
    startX: number,
    startY: number,
    currentX: number,
    currentY: number
) => {
    const WIDTH = 288;
    const HEIGHT = 288;

    const inclineY = ((startX - currentX) * HEIGHT) / WIDTH + startY + HEIGHT;
    const declineY = ((currentX - startX) * HEIGHT) / WIDTH + startY;

    console.log(`inc:${inclineY}, dec:${declineY},cur:${currentY}`);
    if (currentY <= inclineY && currentY <= declineY) return '상';
    if (currentY <= inclineY && currentY >= declineY) return '좌';
    if (currentY >= inclineY && currentY <= declineY) return '우';
    return '하';
};
각 items에 sx,sy 키를 추가한 뒤 각 Item 컴포넌트가 그려지면 useRef를 통해 렌더링 이후 sx,sy에 각 컨텐츠의 시작 지점을 저장했다.
'use client';

import { useCallback, useEffect, useRef, useState } from 'react';

type ItemType = {
    id: number;
    color: string;
    sx: number;
    sy: number;
};
const dummyItems: ItemType[] = [
    {
        id: 1,
        color: 'bg-red-500',
        sx: 0,
        sy: 0,
    },
    {
        id: 2,
        color: 'bg-orange-500',
        sx: 0,
        sy: 0,
    },
    {
        id: 3,
        color: 'bg-yellow-500',
        sx: 0,
        sy: 0,
    },
    {
        id: 4,
        color: 'bg-green-500',
        sx: 0,
        sy: 0,
    },
    {
        id: 5,
        color: 'bg-blue-500',
        sx: 0,
        sy: 0,
    },
];

export default function Home() {
    const [items, setItems] = useState(dummyItems);
    const currentDraggingItemId = useRef(-1);
    const draggableTagetItemId = useRef(-1);

    const dragStartHandler = (id: number) => {
        currentDraggingItemId.current = id;
    };

    const dragEnterHandler = (targetId: number) => {
        if (currentDraggingItemId.current === targetId) return;
        draggableTagetItemId.current = targetId;
    };
    const dragEndHandler = () => {
        if (currentDraggingItemId.current === draggableTagetItemId.current)
            return;
        const copied = [...items];
        const sourcrIndex = items.findIndex(
            (i) => i.id === currentDraggingItemId.current
        );
        const destinyIndex = items.findIndex(
            (i) => i.id === draggableTagetItemId.current
        );
        const temp = structuredClone(items[sourcrIndex]);
        copied[sourcrIndex] = structuredClone(items[destinyIndex]);
        copied[destinyIndex] = temp;
        setItems(copied);
    };

    const registerRectangleStartPoint = useCallback(
        (id: number, x: number, y: number) => {
            setItems((prev) =>
                prev.map((item) =>
                    item.id === id
                        ? {
                              ...item,
                              sx: x,
                              sy: y,
                          }
                        : item
                )
            );
        },

        []
    );

    return (
        <section className="bg-slate-200  flex flex-col justify-between items-center gap-y-10 ">
            {items.map((item) => (
                <Item
                    item={item}
                    onDragStart={dragStartHandler}
                    onDragEnter={dragEnterHandler}
                    onDragEnd={dragEndHandler}
                    onRegistStartPoint={registerRectangleStartPoint}
                    key={item.id}
                />
            ))}
        </section>
    );
}

interface ItemProps {
    item: ItemType;
    onDragStart: (targetId: number) => void;
    onDragEnter: (targetId: number) => void;
    onRegistStartPoint: (id: number, x: number, y: number) => void;
    onDragEnd: () => void;
}

const calculateQuadrantPosition = (
    startX: number,
    startY: number,
    currentX: number,
    currentY: number
) => {
    const WIDTH = 288;
    const HEIGHT = 288;

	const inclineY = Math.round(
        ((startX - currentX) * HEIGHT) / WIDTH + startY + HEIGHT
    );
    const declineY = Math.round(
        ((currentX - startX) * HEIGHT) / WIDTH + startY
    );

    console.log(`inc:${inclineY}, dec:${declineY},cur:${currentY}`);
    if (currentY <= inclineY && currentY <= declineY) return '상';
    if (currentY <= inclineY && currentY >= declineY) return '좌';
    if (currentY >= inclineY && currentY <= declineY) return '우';
    return '하';
};

function Item({
    item,
    onDragEnd,
    onDragStart,
    onDragEnter,
    onRegistStartPoint,
}: ItemProps) {
    const rectangleRef = useRef<HTMLDivElement>(null);

    useEffect(() => {
        if (rectangleRef.current) {
            const { x, y } = rectangleRef.current.getBoundingClientRect();
            const [sx, sy] = [x + window.scrollX, y + window.scrollY];
            onRegistStartPoint(item.id, sx, sy);
        }
    }, [onRegistStartPoint, item.id]);

    return (
        <div
            ref={rectangleRef}
            draggable
            onDragStart={() => onDragStart(item.id)}
            onDragEnter={() => onDragEnter(item.id)}
            onDragEnd={onDragEnd}
            className={`size-72 ${item.color}`}
            onClick={(e) => {
                const [currentX, currentY] = [e.pageX, e.pageY];
                console.log(item.sx, item.sy);
                console.log(
                    calculateQuadrantPosition(
                        item.sx,
                        item.sy,
                        currentX,
                        currentY
                    )
                );
            }}
        />
    );
}
3. 드래그 드랍과 사분면 함수를 연결하여 드래그 한 것을 드랍 한 사분면에 놓았을 때 어느 위치인지 ui로 표시해준다.
1) 드래그 중일 때 드랍 될 컨텐츠를 지나치면 발생하는 이벤트인 drag Over를 사용하여 이 동작을 구현할 것이다.
2) 드래그 중인 것과 드랍 될 곳이 같은 곳이라면 이벤트 발동은 되지 않는다.
if (targetId === currentDraggingItemId.current) return;3) 드랍 컨텐츠를 움직일 때마다 이벤트 처리를 해주는 것은 렌더링에 악영향을 끼칠 것이기에 트롤링을 통해 500ms당 한 번씩만 ui 처리를 해줄 것이다.
const [throttle, setThrottle] = useState(false);

//fucntion
    if (throttle === true) return;
        setThrottle(true);
        setTimeout(() => {
            setThrottle(false);
        }, 500);
4) 2번에서 만들어놨던 사분면 위치 함수를 사용하여 커서에 따른 드랍 될 요소의 사분면 위치를 반환 받는다.
type CalculateQuadrantProps = {
    startX: number;
    startY: number;
    currentX: number;
    currentY: number;
};

const position = calculateQuadrantPosition(calculateProps);
5) 반환 될 값에 따라 컨텐츠에 그림자를 입혀주는 것으로 UI 를 처리한다.
const displayShadowInDroppable = (
    position: string,
    ref: RefObject<HTMLDivElement>
) => {
    let shadow: string;
    switch (position) {
        case '상':
            shadow = '0px -10px 10px rgba(0, 0, 0, 1)';
            break;
        case '좌':
            shadow = '-10px 0px 10px rgba(0, 0, 0, 1)';
            break;
        case '우':
            shadow = '10px 0px 10px rgba(0, 0, 0, 1)';
            break;
        default:
            shadow = '0px 10px 10px rgba(0, 0, 0, 1)';
    }
    ref.current?.style.setProperty('box-shadow', shadow);
};


    const dragOverHandler = (
        targetId: number,
        ref: RefObject<HTMLDivElement>,
        calculateProps: CalculateQuadrantProps
    ) => {
        if (targetId === currentDraggingItemId.current) return;
        if (throttle === true) return;
        setThrottle(true);
        setTimeout(() => {
            setThrottle(false);
        }, 500);

        const position = calculateQuadrantPosition(calculateProps);
        displayShadowInDroppable(position, ref); 	// 함수 실행
    };
6) 드랍이 끝났을 땐 box shadow를 지워준다.
onDrop={(e) => {
    e.currentTarget.style.setProperty('box-shadow', 'none');
}}
7) 드랍이 끝났을 때 이 동작이 알맞게 실행됐는지 확인하기 위해 위치 스왑 동작을 줘본다.
const dropHandler = () => {
    if (
        currentDraggingItemId.current === droppableTagetItemId.current ||
        droppableTagetItemId.current === -1
    )
        return;
    const copied = [...items];
    const sourceIndex = copied.findIndex(
        (i) => i.id === currentDraggingItemId.current
    );
    const targetIndex = copied.findIndex(
        (i) => i.id === droppableTagetItemId.current
    );

    [copied[sourceIndex], copied[targetIndex]] = [
        {
            ...copied[targetIndex],
            sx: copied[sourceIndex].sx,
            sy: copied[sourceIndex].sy,
        },
        {
            ...copied[sourceIndex],
            sx: copied[targetIndex].sx,
            sy: copied[targetIndex].sy,
        },
    ];
    setItems(copied);
    currentDraggingItemId.current = -1;
    droppableTagetItemId.current = -1;
};

// Item Component
onDrop={(e) => {
    onDrop();
    e.currentTarget.style.setProperty('box-shadow', 'none');
}}
아래는 전체 코드이고 다음 글에서는 이진트리의 내부와 로직을 구현한 뒤 컴포넌트와 연결하는 실습을 해볼 것이다
'use client';

import { RefObject, useCallback, useEffect, useRef, useState } from 'react';

type ItemType = {
    id: number;
    color: string;
    sx: number;
    sy: number;
};
const dummyItems: ItemType[] = [
    {
        id: 1,
        color: 'bg-red-500',
        sx: 0,
        sy: 0,
    },
    {
        id: 2,
        color: 'bg-orange-500',
        sx: 0,
        sy: 0,
    },
    {
        id: 3,
        color: 'bg-yellow-500',
        sx: 0,
        sy: 0,
    },
    {
        id: 4,
        color: 'bg-green-500',
        sx: 0,
        sy: 0,
    },
    {
        id: 5,
        color: 'bg-blue-500',
        sx: 0,
        sy: 0,
    },
];

type CalculateQuadrantProps = {
    startX: number;
    startY: number;
    currentX: number;
    currentY: number;
};
const calculateQuadrantPosition = ({
    currentX,
    currentY,
    startX,
    startY,
}: CalculateQuadrantProps) => {
    const WIDTH = 288;
    const HEIGHT = 288;

    const inclineY = Math.round(
        ((startX - currentX) * HEIGHT) / WIDTH + startY + HEIGHT
    );
    const declineY = Math.round(
        ((currentX - startX) * HEIGHT) / WIDTH + startY
    );

    // console.log(`inc:${inclineY}, dec:${declineY},cur:${currentY}`);
    if (currentY <= inclineY && currentY <= declineY) return '상';
    if (currentY <= inclineY && currentY >= declineY) return '좌';
    if (currentY >= inclineY && currentY <= declineY) return '우';
    return '하';
};

const displayShadowInDroppable = (
    position: string,
    ref: RefObject<HTMLDivElement>
) => {
    let shadow: string;
    switch (position) {
        case '상':
            shadow = '0px -10px 10px rgba(0, 0, 0, 1)';
            break;
        case '좌':
            shadow = '-10px 0px 10px rgba(0, 0, 0, 1)';
            break;
        case '우':
            shadow = '10px 0px 10px rgba(0, 0, 0, 1)';
            break;
        default:
            shadow = '0px 10px 10px rgba(0, 0, 0, 1)';
    }
    ref.current?.style.setProperty('box-shadow', shadow);
};

export default function Home() {
    const [items, setItems] = useState(dummyItems);
    const [throttle, setThrottle] = useState(false);
    const currentDraggingItemId = useRef(-1);
    const droppableTagetItemId = useRef(-1);

    const dragStartHandler = (id: number) => {
        currentDraggingItemId.current = id;
    };

    const dragEnterHandler = (targetId: number) => {
        if (currentDraggingItemId.current === targetId) return;
        droppableTagetItemId.current = targetId;
    };

    const dragOverHandler = (
        targetId: number,
        ref: RefObject<HTMLDivElement>,
        calculateProps: CalculateQuadrantProps
    ) => {
        if (targetId === currentDraggingItemId.current) return;
        if (throttle === true) return;
        setThrottle(true);
        setTimeout(() => {
            setThrottle(false);
        }, 500);

        const position = calculateQuadrantPosition(calculateProps);
        displayShadowInDroppable(position, ref);
    };

    const dropHandler = () => {
        if (
            currentDraggingItemId.current === droppableTagetItemId.current ||
            droppableTagetItemId.current === -1
        )
            return;
        const copied = [...items];
        const sourceIndex = copied.findIndex(
            (i) => i.id === currentDraggingItemId.current
        );
        const targetIndex = copied.findIndex(
            (i) => i.id === droppableTagetItemId.current
        );

        [copied[sourceIndex], copied[targetIndex]] = [
            {
                ...copied[targetIndex],
                sx: copied[sourceIndex].sx,
                sy: copied[sourceIndex].sy,
            },
            {
                ...copied[sourceIndex],
                sx: copied[targetIndex].sx,
                sy: copied[targetIndex].sy,
            },
        ];
        setItems(copied);
        currentDraggingItemId.current = -1;
        droppableTagetItemId.current = -1;
    };

    const registerRectangleStartPoint = useCallback(
        (id: number, x: number, y: number) => {
            setItems((prev) =>
                prev.map((item) =>
                    item.id === id
                        ? {
                              ...item,
                              sx: x,
                              sy: y,
                          }
                        : item
                )
            );
        },

        []
    );

    return (
        <section className="bg-slate-200  flex flex-col justify-between items-center gap-y-10 py-20">
            {items.map((item) => (
                <Item
                    item={item}
                    onDragStart={dragStartHandler}
                    onDragEnter={dragEnterHandler}
                    onDragOver={dragOverHandler}
                    onDrop={dropHandler}
                    onRegistStartPoint={registerRectangleStartPoint}
                    key={item.id}
                />
            ))}
        </section>
    );
}

interface ItemProps {
    item: ItemType;
    onDragStart: (targetId: number) => void;
    onDragEnter: (targetId: number) => void;
    onDragOver: (
        targetId: number,
        ref: RefObject<HTMLDivElement>,
        calculateProps: CalculateQuadrantProps
    ) => void;
    onRegistStartPoint: (id: number, x: number, y: number) => void;
    onDrop: () => void;
}

function Item({
    item,
    onDrop,
    onDragStart,
    onDragEnter,
    onDragOver,
    onRegistStartPoint,
}: ItemProps) {
    const rectangleRef = useRef<HTMLDivElement>(null);

    useEffect(() => {
        if (rectangleRef.current) {
            const { x, y } = rectangleRef.current.getBoundingClientRect();
            const [sx, sy] = [x + window.scrollX, y + window.scrollY];
            onRegistStartPoint(item.id, sx, sy);
        }
    }, [onRegistStartPoint, item.id]);

    return (
        <div
            ref={rectangleRef}
            draggable
            onDragStart={() => onDragStart(item.id)}
            onDragEnter={() => onDragEnter(item.id)}
            onDragOver={(e) => {
                e.preventDefault();
                const [currentX, currentY] = [e.pageX, e.pageY];
                onDragOver(item.id, rectangleRef, {
                    startX: item.sx,
                    startY: item.sy,
                    currentX,
                    currentY,
                });
            }}
            onDrop={(e) => {
                onDrop();
                e.currentTarget.style.setProperty('box-shadow', 'none');
            }}
            className={`size-72 ${item.color} relative overflow-hidden `}
        >
            <div className="absolute top-0 left-0 w-full h-full overflow-hidden">
                <div className="absolute top-0 right-0 w-[2px] h-[150%] bg-black rotate-45 origin-top-left" />
                <div className="absolute top-0 left-0 w-[2px] h-[150%] bg-black -rotate-45 origin-top-left" />
            </div>
        </div>
    );
}'FrontEnd > React.js' 카테고리의 다른 글
| 토스의 "자료구조를 활용한 복잡한 프론트엔드 컴포넌트 제작하기"를 구현해보기 (3) (0) | 2025.04.14 |
|---|---|
| 토스의 "자료구조를 활용한 복잡한 프론트엔드 컴포넌트 제작하기"를 구현해보기 (2) (0) | 2025.04.13 |
| [React] 카카오 api를 통해 주소를 좌표로 변환해보기 (undefinded Geocorder) (1) | 2024.09.06 |
| react-day-picker 에서 한글화 시키기 (feat. date-fns) (1) | 2024.09.04 |
| custom Infinite Scrolling hooks (with tanstack Query in Next.js) (3) | 2024.09.03 |


